Installing Virtual Box Guest Additions
Introduction
In this post, we will see how to install the Virtual Box Guest Additions in a Virtual Box. We will focus in the case of the guest OS being a Linux system.
Basic concepts
Let us just revise a few basic concepts about virtual machines and Virtual Box.
Everyone is probably familiar with the concept of a physical machine, like the computer you use everyday. In this case, you have an operating system (a.k.a. OS, such as Windows, Linux or MacOS) that runs on a physical (i.e., real) machine. All the software you use on this computer runs “inside” this Operating System and uses services provides by the OS. For instance, when you are editing a file in Word, Word does not write directly to the screen to show you the file contents. It talks to the operating system, sending commands that the OS interprets, and executes the corresponding action, such as displaying the contents of your document. This allows the same software (e.g., Word for Windows) to run on different computers, with hardware that is not all the same, because the operating system (and other software that runs “below” the operating system, such as the BIOS 1) takes care of the differences in hardware, providing an uniform interface.
In a Virtual Machine, the Operating System runs, not on top of a physical device, but inside a computer program, called the virtualization software, that creates to this operating system the “illusion” that it is running on a “real” computer. This is done by providing the operating system with the same responses that the real, physical system would provide. In the real (i.e. physical) computer, the operating system would read and write to devices and circuits in the motherboard; in a virtual machine, the virtualizer (the virtualization software) receives the requests from the operating system and responds in the same way as a physical computer would do. For the operating system running inside the virtualizer, there is (almost…) no difference and “business runs as usual”.
In this way, we have “computers running inside computers”. In a single physical computer, we can have different virtual machines, even with operating systems different from the one in the physical computer. The operating system of the physical computer, where the virtualizer runs, is called the host computer system. The operating systems running in the virtual machines are called the guest computer systems.
What is VirtualBox
VirtualBox is one of the most popular virtualization softwares. Oracle, the owner of VirtualBox, defines it as “a general-purpose full virtualization software for x86_64 hardware (with version 7.1 additionally for macOS/Arm)”.
Another popular virtualization software is VMware.
What are “Guest Additions”?
According to Oracle, Guest Additions are a set of “device drivers and system applications that optimize the guest operating system for better performance and usability”. These allow the guest operating system (the OS running inside the Virtual Machine, or VM) to have some extra features, such as:
- Mouse pointer integration.
- Shared folders.
- Better video support.
- Seamless windows.
- Generic host/guest communication channels.
- Time synchronization.
- Shared clipboard.
- Automated logins.
How to install VBGuestAdditions
First thing to know: VBGuestAdditions are a set of software applications that are specific to a given guest operating system. This means that the specific GuestAdditions that you install must match the guest operating system. The instructions provided here are for a Linux guest operating system. In other words, they assume that you are running Linux in your virtual machine.
These instructions also assume that your VM is already setup and running, and they show you how to add the VBGuestAdditions to a working VM.
Mount the GuestAdditions CD
The software for the VBGuestAdditions is placed in your computer when the VirtualBox software is installed. In the installation folder, you can find a file called VBoxGuestAdditions.iso. This is called an image file; it stores the data that would be in a CD-ROM with the software, and you need to mount this ISO file in the guest system (your virtual machine).
To do that, in the VirtualBox menu, select “Devices” and then “Insert GuestAdditions CD Image”. If your VirtualBox is configured to Portuguese, you will find a blank line (someone forgot to translate that line…), but do not worry, and just select the blank line above “Upgrade Guest Additions”.

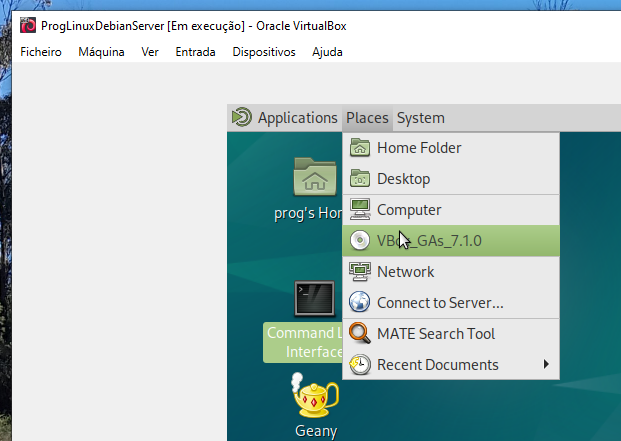
The CD-ROM with the GuestAdditions software should now appear in your virtual machine. You can check it by looking at the “Places” menu in the VM.

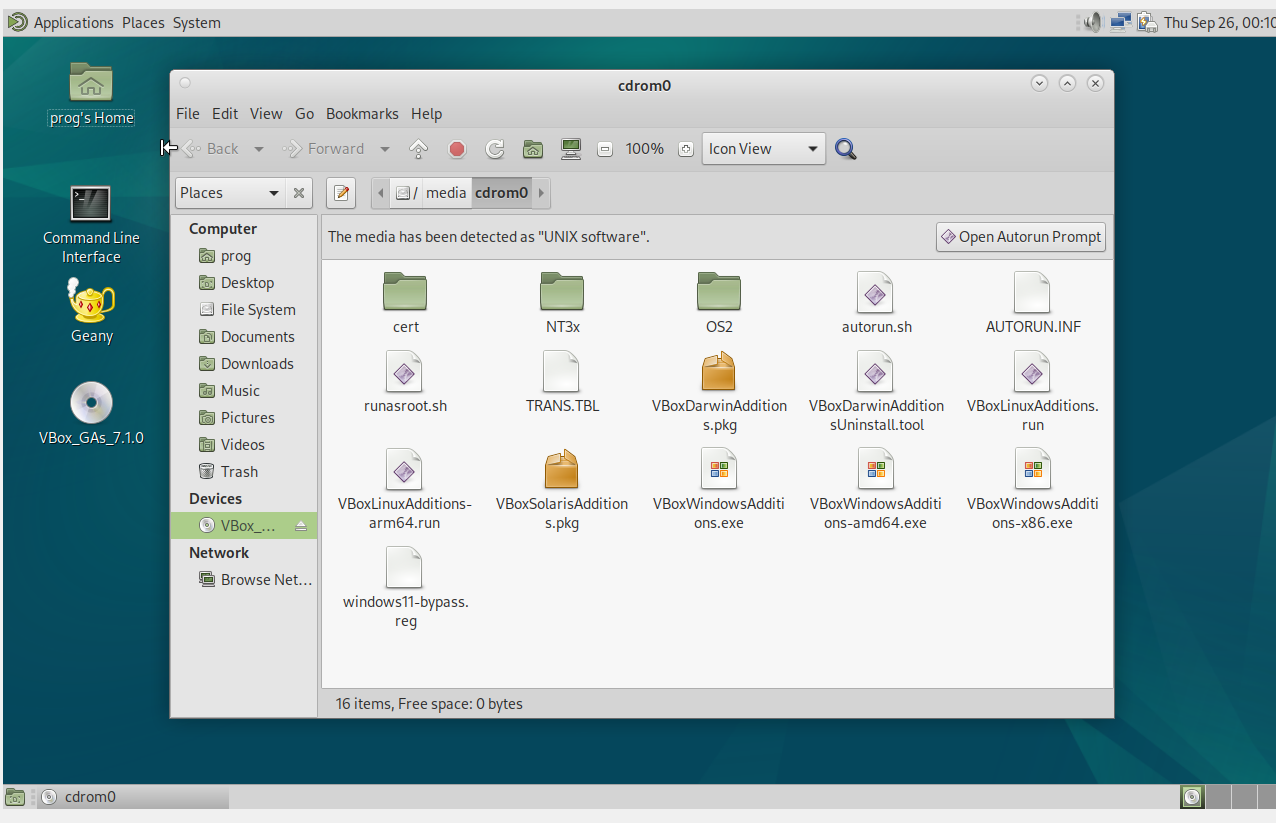
This means that the CD ROM is mounted and you can access its contents. If you click in the “VBox_GAs…” option in “Places”, a window will open showing the CD contents:

Install the system kernel modules
The following step is to install some software (called kernel modules) in the guest machine (your VM). To do that, it is best that you check the OS version you are running. In the command line, write [Note: the $is not to be typed! It is there to represent the prompt, the text and symbols that say that the computer is ready for you to type a command):
$ uname -r
which should produce something like:
Linux 6.1.0-25-amd64
The output of uname shows that you are running Linux and the release you are running is 6.1.0-25-amd64. This will help you choosing which kernel modules to install (each Linux release has specific kernel modules; you should install the kernel modules that correspond to the release you are running in the virtual machine).
The next steps follow the instructions in https://www.virtualbox.org/manual/ch04.html#additions-linux. Do not worry if the language and words used (kernel, headers, chmod, …) seem complicated and are new to you. If you follow these instructions, everything will work fine!2
All the commands are preceded by sudo. sudo puts you working as a “super-user”, with powers to make changes in the system.3
- Install the kernel headers
prog@prog:~$ sudo apt install linux-headers-6.1.0-25-amd64 prog@prog:~$ sudo apt install build-essential dkmsaptis a “package manager” (“apt” stands for “Advanced Package Tool”); it is used in some Linux systems to install, remove and update software packates.installis easy to understand… Finally, the remainder of the line are the packages to be installed. Note that the part afterlinux-headersshould match the numbers that you got withuname -r. - Install VBox Guest Additions:
prog@prog:~$ cd /media/cdrom
prog@prog:~$ sudo bash ./VBoxLinuxAdditions.run
Now, you need a final step, if you want to have folders shared between the host and the guest machines (i.e., between your (real) computer and the virtual machine). You need to add yourself to the group of VBox Shared Folders, vboxsf. To do that, in the command line, type4:
prog@prog~:$ sudo usermod -aG vboxsf prog
Everything is done. You should now restart your virtual machine: shut the VM down. Be sure to select the option “Power off the machine”, and restart. Your virtual machine should be running now with Guest Additions, and you can do things like sharing folders between the host and the guest machines, or having a shared clipboard, allowing to copy in one machine and paste in the other one.
-
BIOS is the “Basic Input-Output System”. It is a small program that runs when you turn on your computer. It’s stored on a chip on the motherboard and acts as a bridge between your computer’s hardware (like the processor, memory, and hard drive) and its operating system (like Windows, Linux, etc.). ↩
-
If not, send me an email or leave a comment at the bottom of the page! ↩
-
So, take care when using
sudo! ↩ -
For those that may be curious about what does this mean and do:
sudois “do as super user” (the admin),usermodis an application to modify a user’s characteristics and properties,-aGmeans add (-a) to a secondary group (G) calledvboxsfthe userprog. ↩
Comments
Your comments are welcome. Feel free to leave here your remarks or your opinion!